Archives

gravatar

How to install Mango (beta) in your WM7 phone (ver 7712)

Finally, I did it. I installed mango beta in my HTC HD7. No doubt this is a great great leap forward for microsoft. But still we need much much more... 


How to install it? I will explain the process. but - I won’t be responsible if you end up damaging your device. Make sure to follow the steps without fail. Because i was able to install mango beta without any issues by following these steps. 


Let me thank windowsphonehacker.com and addictivetips.com for this. 


Requirements:
  1. 1. You must have at least 60% battery remaining in your phone. I completed the entire process by having less than 50% - but its recommended to have 60% or full battery.
  2. 2. Remember that the minimum hardware requirements for Mango beta are the same as Nodo (the last official update to microsoft - which gave you cut-paste option). If your device only supports pre-Nodo versions of WP7, then this procedure is not for you.
  3. 3. Go to this page, and download the file.

Instructions:
  1. 1. If you have a 32-bit system, go to this link, while for 64-bit, here. Download the tool suite provided on the respective links.
  2. 2. Install the developer tools you just downloaded and then exit setup.
  3. 3. Now we turn our attention to the “Mango For All” tool downloaded in step 3 of our requirements. Unzip the file if not a zipped, just copy the four contents), and save the unzipped contents to your system drive (c drive).
  4. 4. Using your phone’s USB cable, connect to your PC. This will automatically open up Zune. If not do nothing. 
  5. 5. If Zune opens up, Exit Zune without doing anything.
  6. 6. From the “Mango for all” folder, run “update.bat” file. This will open up a series of option screens, follow the instructions that do the following for you:
    Create a backup of your phone
    Provide your with enough rights to update to Mango
    Save your backup copy in the “Mango for all” folder (will take approx 600 secs)
  7. 7. This will open Zune all by itself, and you will get an update notification. That’s the Mango beta. After you apply it (update - 1), and reopen Zune, you will see again an update visible there (update - 2). This is the sought-after Mango beta 2. Install this and you now have Mango beta 2 on your WP7 Nodo device! (approx 20 - 30 mins) 
Important:

You must restore to NoDo before the Mango update is released, according to Microsoft. This applies to everyone, including registered developers.


Restore NoDo
To restore NoDo, run the Restore.bat file, or follow the instructions in Readme.txt.


Do not, at any cost, delete the premangostate folder in your C Drive. This is required to restore the Nodo version - once mango is officially out. 


Update: Your Zune will not detect the new mango OS. You have to download and install New Zune for Mango form here. Both old Zune and New Zune can be installed side by side. No problem. 


Thanks to : 

gravatar

Get 25 GB Cloud Storage (How to use Skydrive as Network Storage)

I was searching for a cloud storage application for my laptop, which can work just like my C drive or D Drive. What i mean is a cloud storage were I can drag and drop my files. 


So.. I came across Skydrive. This is a cloud storage service from Microsoft. 


What all you need to start this?


1. A live.com ID from Microsoft. (Click here to get one)


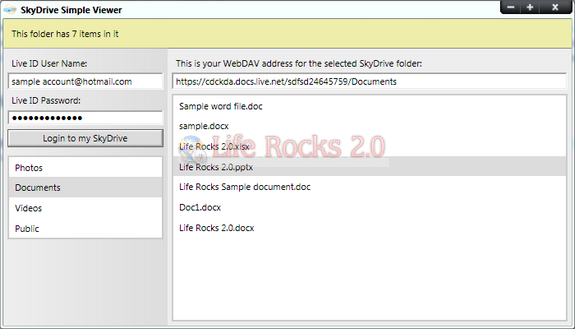
2. Get the WebDAV access address for your Skydrive account. For this there is a simple portable tool called SkyDrive Simple Viewer developed by Mike. Run the tool and login to your Skydrive and select the folder which you want to map.


Once these are ready, 


1. Run the Skydrive Simple Viewer.


Click on your folder you want to network and copy the address from right hand side. 


2. Goto your my computer and click on the Map network drive on the top. 


3. Now Click on the "Connect to a website that you can use to store your documents and pictures" link. 


4. Click Next in the window that pops up.


5. Click on Choose Custom network location and click Next


6. Paste the web address you got from Step -1 above. in the address bar. 


7. Click next


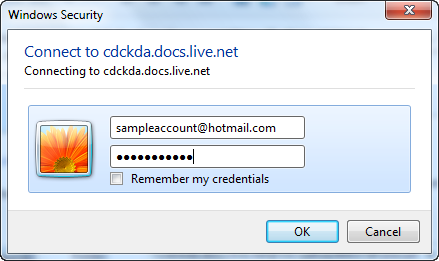
8.  It will prompt you to enter the Windows Live credentials after attempting to connect to Skydrive.


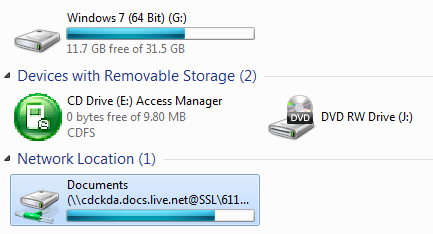
9. Now the network drive will be connected and you can see the drive in Window Explorer.


And thats all... you have a 25GB cloud storage in your computer. Just drag and drop the files. 

gravatar

How Osama bin Laden Was Located and Killed - NY Times


Osama bin Laden Was Located and Killed
After nearly a decade of hunting Osama bin Laden, a breakthrough came in August of 2010 when Bin Laden’s most trusted courier was located and identified. What followed was eight months of painstaking intelligence work, culminating in a helicopter assault in Abbottabad, Pakistan by American military and intelligence operatives that ended in the death of Bin Laden.

The Assault on Bin Laden’s Compound
The raid of Bin Laden’s compound lasted about 40 minutes. He and his family had been living on the second and third floors of the main building, which was the last area to be cleared by American forces. Bin Laden resisted and was shot in the head in the final minutes of the gun battle. Three other men and a woman were also killed.


Finding the Town Where He Was Hiding
While Bin Laden had long been rumored to be hiding in remote tribal areas along the Pakistani-Afghan border, he had been living near the Pakistani Army’s military academy in Abbottabad, a medium-sized city.


Photos of the Compound


Intelligence Leading to Bin Laden’s Killing
Four years ago — American intelligence for the first time uncovers the name of Osama bin Laden's trusted courier but cannot locate him.
Two years ago — American intelligence identifies areas in Pakistan where the courier and his brother have operated but cannot pinpoint exactly where they live.
August 1, 2010 — American intelligence locates the brothers' residence, a compound in Abbottabad. The compound is so large, secluded and secured that analysts conclude it must shelter a high value target.
September 1, 2010 — The C.I.A. begins to work with President Obama on assessments that lead them to believe that Bin Laden may be located at the compound.
Mid-February 2011 — United States government authorities determine that there was a sound intelligence basis to pursue this aggressively and develop courses of action.
March 14-28, 2011 — Mr. Obama holds a series of National Security Council meetings to develop options for capturing or killing Bin Laden.
April 29, 2011 — Mr. Obama authorizes the operation before flying to Alabama to inspect tornado damage.
May 1, 2011, 4-4:30 p.m. ET — United States forces raid Bin Laden's compound in Abbottabad around 1 a.m. Pakistan time. Bin Laden and three other men are killed in a firefight. A woman was killed when she was used as a shield by a male combatant.
May 1, 2011, 11:35 p.m. ET — Mr. Obama announces Bin Laden's death to the world.

gravatar

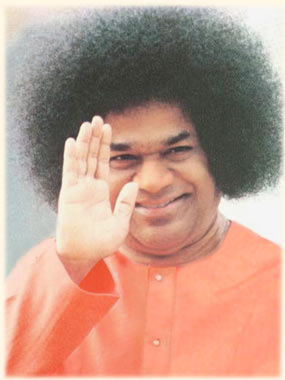
Sathya Sai Baba


Sai Baba

Yesterday world woke up hearing the sad news about Satya Sai. Many would be wondering how I can believe in such human gods? In fact, I don’t. As per the philosophy, for a hungry man, food is GOD. So, Sathya Sai provided free medical treatment, Surgeries, Water projects to not millions, but billions. So he is GOD.

Some people talk in such a way that the definition of GOD is man who does miracles. Yes, Satya Sai did that miracle, he fed the empty stomach, treated the poor and provided spiritual advice to millions. Remember we are living in a age where people are just concerned only about them. How I can make more money. For Eg, Raja. He was the elected representative of the people for the people and by the people. He was suppose to serve the people. Instead, he served many corporate companies and took his share of profit. That profit alone is required to provide free food for the entire Indian population for the next 60 years.

This website provides good info about Sai Baba: 

So who is Satya Sai? Few insights into Satya Sai -

Sathya Sai Baba is the figurehead to a number of free educational institutions, charitable organizations and service projects that are spread over 10,000 centers in 166 countries around the world. It is a Rs 40,000 crore empire. Sathya Sai Baba supports free schools and other charitable works in 166 countries
The Sri Sathya Sai Institute of Higher Learning in Prashanti Nilayam is the only college in India to have received an "A++" rating by the National Assessment and Accreditation Council

The Sri Sathya Sai Institute of Higher Medical Sciences in Puttaparthi (also known as the Super Specialty Hospital) is a 220 bed facility providing advanced surgical and medical care free of cost to the public.

The Sri Sathya Sai Institute of Higher Medical Sciences in Bangalore is a 333 bed facility with advanced operation theatres, ICUs and CCUs meant to benefit the poor.The hospital has served 250,000 patients, free of cost, from January 2001 to April 2004.

The Sri Sathya Sai General Hospital was opened in Whitefield, Bangalore, in 1977 by Sathya Sai Baba to provide free care to poor local villagers.It is a 35,000 sq ft (3,300 m2) building thatprovides complex surgeries, food and medicines free of cost. The hospital has, since its inception, treated over 2 million cases.

The Sri Sathya Sai Central Trust runs several general hospitals, two super specialty hospitals, dispensaries, eye hospitals and mobile dispensaries and conducts medical camps in rural and slum areas in India

The Trust has also funded several major drinking water projects. The first drinking water project, completed in 1996, supplies water to 1.2 million people in 730-800 villages in the drought-prone Anantapur district in Andhra Pradesh.The second drinking water project, completed in 2004, supplies water to Chennai (formerly known as Madras) through a rebuilt waterway named "Sathya Sai Ganga Canal".The third drinking water project would supply water from the Godavari River to half a million people living in five hundred villages in East and West Godavari Districts. Other completed water projects include the Medak District Project benefiting 450,000 people in 179 villages and the Mahbubnagar District Project benefiting 350,000 people in 141 villages. 

gravatar

20 Ways to Use Gmail Filters - by Leo Babauta

One of the coolest things about Gmail is its filters — set up properly, filters can add loads of functionality to your already-powerful Gmail account. Save time and space, rid your inbox of unwanted emails, and turn your Gmail into a multi-functional tool with simple filters.

There are some limitations to Gmail's filters that I'd like to see improved in the future, including:

·         the inability to mark a post as read

·         the inability to create live "smart folders"

·         difficulty in adding a large number of email addresses to a filter

But all in all, the filter function is very cool. Here are some ideas for how to use it:

·         Killfile. If people send me too much junk mail (jokes, chain mail, etc.), they get added to my killfile. It's a simple filter that looks at the "from" field and deletes the message if it's one of the addresses I've added to the filter. Every now and then I'll decide to add someone to my killfile, and I'll just open up the filter and add their address.

·         Booleans. The filter works much like Gmail's search function, in that you can add search terms such as AND or OR or NOT. So I can look for addresses that are from a number of people (using OR), or emails that must include all of the words on a list (using AND). Use search operator symbols to make it even easier: "|" for OR, space for AND, "-" for NOT, and parentheses to group different terms in your search string.

·         Other search terms. Beyond the common terms above, your filters can use other terms such as "from:", "to:", "has:", "is:", "filename:", and "label:", among others. Using these terms, you can make your filters even more powerful.

·         Send reminders to someone. One of the things I wish Google would add to Gmail is the ability to send a delayed email. This would allow me to send reminders to someone at regular times. Instead, I sign up for a reminder email service to send reminders (meant for other people) to my gmail address, and then set up filters to forward the reminders to various people depending on the subject or content of the email. It's not perfect, but it allows me to send reminders to different people on a regular basis.

·         Calendar and log. I set up Google Calendar to send me reminders of events. You can set up a label ("events") so that your calendar reminders go straight to the label, star the message, and skip the inbox. Now not only are your events in one place, instead of scattered through your inbox, you can unstar the message when you complete the task or event, and now you also have a log of all the things you've done.

·         To-dos. This is a commonly used function, but you can email yourself tasks that you need to do, and then set up a filter that has your email address in both the "to" and "from" boxes, that applies the label "to-do" to the message. This will allow you to view all your to-dos in one filter. Or, if you're a GTD fan, you could set up to-dos for each context (@work, @home, @errands, @phone, etc.), by creating different labels for each, and then setting up filters for different email addresses. Email yourself at yourname+work (you don't need the @gmail.com part), and set up the filter to label that address "@work", and so on for each context.

·         Follow up. Even if you're not a GTD fan, having a follow-up label is a must. Simply set up a filter with an email address such as "youname+follow" and put it in the "has the words" filter field, and have this filter label it "@follow" and skip the inbox. Now when you send out an email that needs to be followed up on, put yourname+follow in the "bcc" field, and it'll go into your "@follow" label. Be sure to check this label once a day so you can follow up on your emails.

·         Send spam to trash. Instead of having Gmail-filtered spam go into your Spam folder (and have the annoying count of unread spam by the folder's name), set up a filter with "is:spam" in the "has the words" field (just click "OK" on Gmail's warning dialog box when you click next step) and "Delete it" as the action. Now all spam messages will go in your trash.

·         Archived bookmarks. If you use del.icio.us and other bookmarking services, you can archive them all in a Gmail label ("bookmarks"). Get the feed urls for each of your bookmarking services, enter them in a forwarding service such as rssfwd.com, and then set up a filter to label them all "bookmarks". Now all your bookmarks are in one place, with Gmail's great search.

·         Attachments. If you're like me, you like to go through your old emails and delete a bunch of them at a time. I do common searches during the cleanup process, such as "has:attachment", so that I can look through all my bigger emails and delete them. Make this process quicker by making a label and filter for this search, and for any of your common searches, for that matter.

·         Media. If you get a lot of media sent to you, such as music files, videos and photos, set up filters ("filename:wmv | filename:mov" for videos, "filename:mp3″ for music, filename:jpg | filename:gif" for photos, or "filename:pdf | filename:doc" for documents). Now you can quickly find any media.

·         Backups. Create a second Gmail account for storage, and create a filter to automatically forward any emails with attachments ("has:attachments") to this second address. Now you can delete your old emails without guilt or worry.

·         Newsgroups or feeds. You can set up filters for your newsgroups, so they don't clog up your inbox. Or forward your favorite feeds to your Gmail, and automatically label and archive them for later reading. Now you can not only access them from anywhere, but you can search them too.

·         Bloggers. If you run a blog, you can have all your blog's comments and pingbacks automatically archived and labeled ("blog"), so your inbox doesn't get filled up fast. Also have your blog stat reports mailed to you and shunted to this label, so you can get a quick look at your blog's success at a glance.

·         Delete old sent emails. There's no reason, in most cases, to keep your really old sent emails. Delete them. Create a filter with "before:2006/06/01 label:sent" with "Delete it" as the action (you'll need to click "OK" to Gmail's warning dialog). Every month or so, update the date of this filter.

·         No delete. Some emails you don't want to delete — those precious ones from your kids, for example, or maybe ones from your boss. Set up a label ("nodelete") and a filter that puts the nodelete label on emails from (or to) the addresses you want. Now, some of the above filters, add the string "-nodelete" so that it doesn't show these emails. Now you can delete your old sent emails, or your attachment emails, for example, without worry that your kids' or boss' emails will be trashed along with the rest of the riffraff.

·         Flickr. Forward your Flickr account's feed to your Gmail, with a filter to automatically label it, and now your photos are searchable through Gmail. You can also set up filters to send notices that certain tags in your Flickr account has new photos to certain relatives.

·         Notes. Email yourself notes on web research, on meetings, on books you're reading, on classes you're taking. Set up a filter to archive and label them (if you send notes to yourname+notes, for example). Now they're searchable and archived and accessible from anywhere.

·         Twitter. Use your mobile phone to send text messages or IM messages to Twitter, with a keyword at the beginning of each Twitter message (NOTE, TODO, BLOG, FOLLOW, etc.). Forward your Twitter account's feed to your Gmail, and set up filters for each type of keyword ("note twitter" will be labeled "note" for example). Now you can use your mobile device to send notes, to-dos, follow-up reminders and more to your Gmail through Twitter.

·         Wildcard. Use the wildcard character (*) for companies that use multiple types of address from the same domain. One great use I've seen is to use the wildcard character for vendors such as Amazon or eBay to make it easier to track online purchases. Create a label ("online shopping") and a filter with such email addresses as "*@amazon.com|*@ebay.com|*@paypal.com|*@barnesandnoble.com".

Original Link: Click here


>